-

Réka Horváth ha publicado una actualización
hace meses (editado)
#RetoDelPan
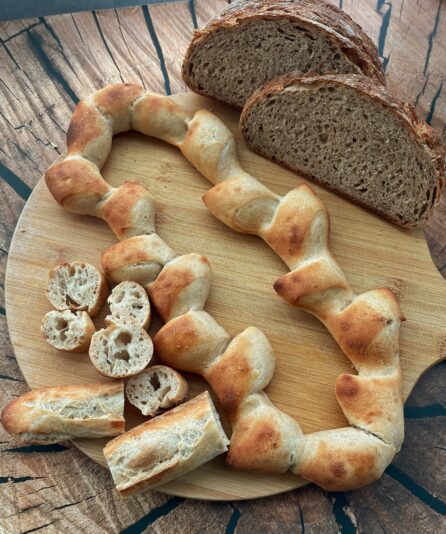
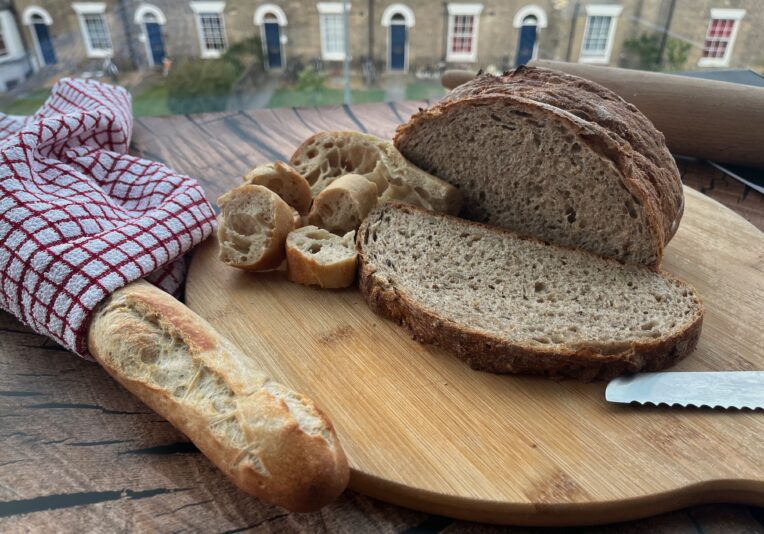
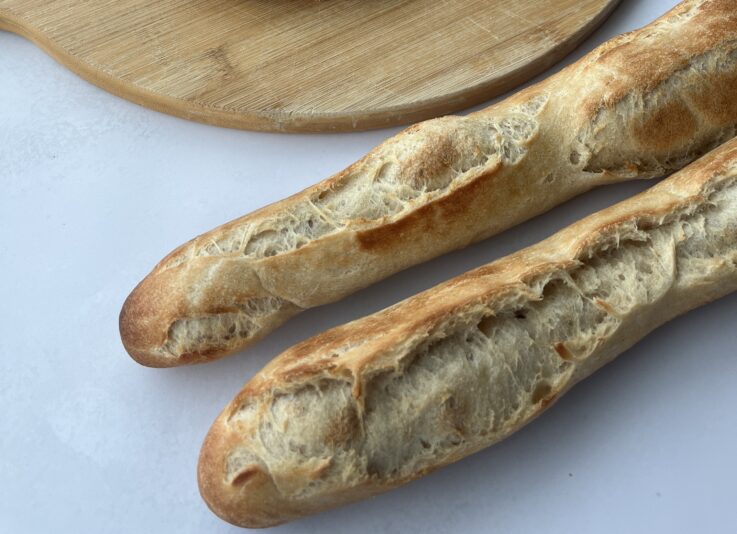
En este post, voy a mostrar el proceso de elaboración de las baguettes de mi bandeja de pan (1ª 2 fotos).
El proceso:
Paso 1: Hacer un poolish
Un poolish es un tipo de pre-fermento compuesto por partes iguales de harina y agua. En mi caso, utilicé 176 g de agua fría, 176 g de harina de pan de trigo y una pizca de levadura para iniciar la fermentación. Fermenté durante 16 horas a temperatura ambiente (entre 22 °C y 25 °C) hasta que se formaron burbujas. Hacer un fermento de poolish tiene las siguientes ventajas:
- Favorece el desarrollo del sabor fermentado y sube mejor gracias a una fermentación más larga.
Durante la fermentación, las células de levadura producen una variedad de alcoholes y otros compuestos que son responsables del sabor del pan. Una fermentación más larga produce una mayor cantidad de estos compuestos. Además del sabor, la levadura también produce gases leudantes que son útiles en la fase posterior de fermentación en el horno. - La prefermentación favorece la actividad enzimática, que tiene un efecto positivo en la extensibilidad del pan.
Hacer una prefermentación permite que las enzimas de la harina hagan su efecto e interfieran en el desarrollo del gluten, ya que debilitan los filamentos (proteólisis) y, por tanto, esto da lugar a una estructura más extensible. Para una baguette, esto es especialmente importante porque esperamos una miga más abierta. (En este caso, básicamente queremos que los gases leudantes puedan desgarrar algunas de las hebras más débiles para formar alvéolos más grandes) Además, esto también nos ayuda a la hora de dar forma a la baguette, que requiere que la masa sea bien extensible.
En este caso, el agua fría ayuda a tener una fermentación a ritmo controlable que es una ventaja cuando se trabaja con poolish que necesita una larga fermentación.
Paso 2: Preparación de la masa final
En primer lugar, mezclé 412 g de harina y 4 g de levadura seca instantánea. A continuación, mezclé 218 g de agua, 352 g de poolish y 13 g de sal por separado. Decidí hacerlo así porque la sal -cuando no está disuelta- puede estar presente en concentraciones localmente elevadas que inhiben en gran medida la actividad de la levadura (porque la sal puede someter a las células a una presión osmótica). Por lo tanto, mezclar los ingredientes premezclados después es la opción más práctica.
En este caso, la función de la levadura seca adicional es leudar más la masa y proporcionar más gases que serán beneficiosos en la fase de primavera en el horno. Principalmente, esta porción de levadura será la responsable del correcto levado. La sal refuerza las hebras de gluten y ayuda al desarrollo de la estructura, al tiempo que ralentiza la fermentación para que sea más difícil fermentar en exceso la masa. En este caso, tenemos un 67% de hidratación en la masa, que es un rango clásico para las baguettes, ya que es lo suficientemente blanda como para ser extensible y, al mismo tiempo, conserva una buena estructura. El agua adicional también contribuye a la formación de alvéolos porque hace que la masa sea más extensible y, por lo tanto, las burbujas de gas crecientes crean más fácilmente las características bolsas grandes en la fase de primavera del horno.
Paso 3: Con una batidora de mano, mezclé los elementos de la masa durante unos minutos a velocidad baja hasta obtener una masa homogénea. Después, seguí mezclando a velocidad media (esto proporciona la agitación necesaria para el desarrollo del gluten además del agua) hasta obtener una masa lisa con un buen desarrollo del gluten.
Paso 4: Fermenté la masa a granel hasta que casi se duplicó. Esto llevó aproximadamente una hora a 24 °C. Tras este periodo de reposo inicial, realicé pliegues 3 veces cada 40 minutos en la siguiente parte del proceso de fermentación. Los pliegues refuerzan el desarrollo del entramado de gluten, al tiempo que ayudan a redistribuir el aire. Al plegar, también presioné un poco los pliegues con las manos para que la distribución del aire fuera más uniforme.
Paso 6: Tras el último pliegue, dejé reposar el pan durante 20 minutos para que el gluten se relajara y fuera más fácil trabajarlo. A continuación, dividí la masa en 3 partes, di forma a cada una de ellas en rectángulos más grandes y las dejé reposar de nuevo para que el gluten se relajara durante 15 minutos.
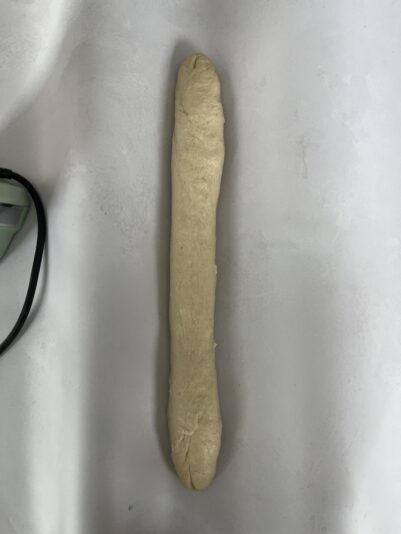
Paso 7: Primero le di forma a la baguette. Para ello, doblé los lados del rectángulo hacia el centro y presioné para apretar 2 veces, y después de cada vez, utilicé el talón de la mano para sellar los bordes. Después, enrollé la masa para obtener una forma de baguette alargada y la dejé reposar durante 35 minutos para que se endureciera cubierta con film transparente a unos 24 °C. Como no tengo un sofá de lino, utilicé uno de mis fondos de fotografía de alimentos para sujetar la forma de baguette.
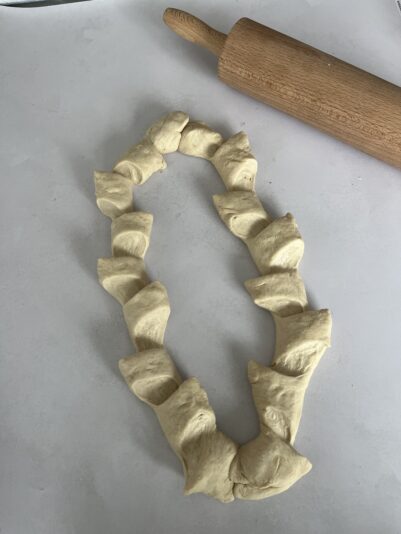
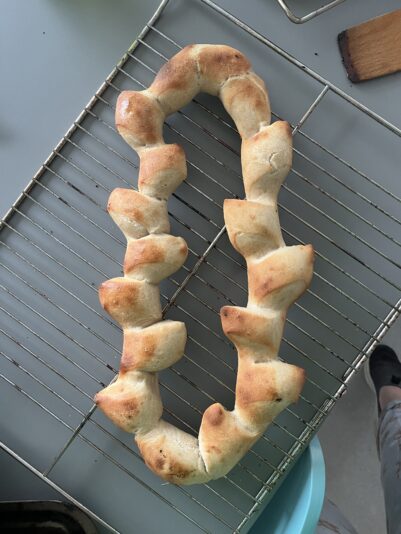
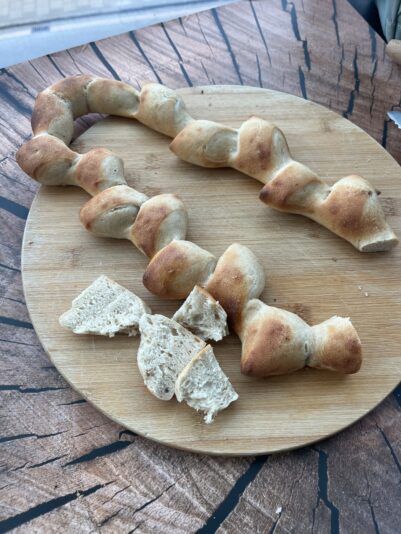
Mientras tanto, cogí los otros dos trozos de masa y les di la misma forma cilíndrica. Después, cogí unas tijeras y empecé a cortar en la masa, y dispuse los trozos en lados alternos para obtener la forma de epi. Cuando ambas piezas estuvieron listas, las uní por los extremos y las dejé reposar cubiertas con film transparente durante unos 35 minutos. Para ambas formas, el tiempo de fermentación es aproximado. Yo terminé la fermentación cuando la masa rebotó lentamente después de presionarla. (Técnicamente, esto es no fermentar lo suficiente la masa, lo cual está bien porque queremos que las baguettes suban lo máximo posible en la fase de primavera del horno). Esto hace que en el periodo inicial de la fase de horneado el gluten sea más elástico -aún no se ha estirado del todo-, lo que ayuda a mantener la forma y la formación de la estructura interna deseada. En este punto, por tanto, no sólo los gases ya presentes contribuyen a la expansión, sino también la levadura, hasta que la masa alcanza una temperatura en la que mueren) Antes de meterla en el horno, marqué la superficie de la baguette recta con líneas diagonales.
Paso 8: Utilicé una bandeja y un baño maría para vaporizar previamente mi horno, y fijé la temperatura a 250 °C. El vapor es necesario porque la baguette sube más en el horno y, por lo tanto, la formación de la corteza debe retrasarse, ya que el vapor ayuda a mantener húmeda la superficie del pan. Además, utilicé una bandeja de horno de acero inoxidable para una transferencia de calor más rápida que ayuda a conseguir la máxima primavera inicial. Horneé el pan hasta que se doró y lo enfrié sobre una rejilla.
El objetivo era crear una baguette con una miga abierta y una buena elasticidad al horno, apoyada por un poolish para conseguir extensibilidad y sabor. Como resultado, obtuve una baguette con alvéolos bastante grandes, sin embargo, en el lateral en algunos lugares vi una miga ligeramente más densa. Sospecho que la razón de esto debe ser que desafortunadamente olvidé apagar el calentamiento superior al principio, lo que hizo que la superficie de la baguette recta formara costra demasiado pronto, por lo que no pudo expandirse completamente. Por la misma razón, la miga también se abrió de forma un poco irregular, por lo que el vapor se escapó por varios sitios, lo que hizo que la masa se agrietara un poco en ciertas zonas. En el caso de la forma epi, los alveolos son más pequeños, lo que creo que es consecuencia de la propia forma, así como de una temperatura del horno ligeramente inferior en este punto.
#BreadChallenge
In this post, I am going to show the process of making the baguettes from my bread platter (1st 2 pictures). I am an amateur baker.
The process:
Step 1: Making a poolish
A poolish is a pre-ferment type consisted of equal parts of flour and water. In my case, I used 176 g cold water, 176 g wheat bread flour and a pinch of yeast to start the fermentation. I fermented this for 16 hours at room temperature (in the 22 °C and 25 °C range) until it was bubbly on top. Making a poolish starter has the following advantages:
- Helps the development of fermented flavour and better rise by longer fermentation.
While fermenting, yeast cells produce a variety of alcohols and other compounds that are responsible for the flavour of the bread. Longer fermentation results in more of such compounds. In addition to flavour, yeast also produces leavening gases that is helpful at the oven spring stage later on. - Pre-fermentation helps enzymatic activity that has a positive effect on the bread’s extensibility.
Making a pre-ferment allows enzymes in flour to take their effect and interfere with gluten development as they weaken strands (proteolysis) and hence this results in a more extensible structure. For a baguette, this is particularly important because we expect a more open crumb. (Here, we basically would like to use that the leavening gases will be able to tear apart some of the weaker strands to form larger alveoli.) In addition, this also helps us when shaping the baguette, which requires the dough to be well-extensible.
In this case, the cold water helps to have a fermentation at controllable pace that is an advantage when working with poolish that needs long proofing.
Step 2: Preparing the final dough
First, I combined 412 g flour and 4 g instant dry yeast. After, I mixed 218 g water, 352 g poolish and 13 g salt separately. I decided to do this because salt – when not dissolved – can be present in locally high concentrations that largely inhibit yeast activity (because salt can put the cells under osmotic pressure). Mixing the pre-mixed ingredients after therefore is the more practical option.
Here, the function of the additional dry yeast is to leaven the dough further and provide more gases that will be beneficial at the oven spring phase. Mainly this portion of yeast will be responsible for the proper rise. Salt strengthens gluten strands and helps structure development, while also slows fermentation so that it is harder to overproof the dough. In this case, we have 67% hydration in the dough which is a classic range for baguettes as it is soft enough to be extensible while still retains good structure. The additional water also contributes to the formation of alveoli because it makes the dough more stretchable, and therefore, the growing gas bubbles create the characteristic large pockets more easily in the oven spring phase.
Step 3: With a hand mixer, I mixed the elements of the dough for a few minutes on low speed until homogeneous. After, I mixed at medium speed further (this provides the agitation needed for gluten development besides water) until I obtained a smooth dough with good gluten development.
Step 4: Bulk fermented the dough until it nearly doubled. This took approximately an hour at 24 °C. After this initial resting period, I performed folds 3 times in every 40 minutes in the next part of the fermentation process. The folds strengthen the development of the gluten framework, while also help to redistribute air. When folding, I also pressed the folds a little with my hands so that the distribution of air becomes more even.
Step 6: After the last fold, I let the bread rest for 20 minutes for the gluten to relax and make it easier to work with. Subsequently, I divided the dough into 3, and shaped each bit into larger rectangles and let them rest again for gluten relaxation for 15 mins.
Step 7: I then first shaped the baguette. For this, I folded the sides of the rectangle to the center and pressed to tighten 2 times, and after each time, I used the heel of my hand to seal the edges. After, I rolled the dough to obtain a long baguette shape and set it aside for 35 mins to proof covered by cling film at around 24 °C. As I don’t have a linen couch, I used one of my food photography backgrounds to hold the baguette shape.
Meanwhile, I took the other two dough bits and shaped the same cylinders. After, I took a pair of scissors and started to cut into the dough, and arranged the pieces onto alternating sides to obtain the epi shape. When both pieces were ready, I attached them together at their end, and let them proof covered by cling film for around 35 mins. For both shapes, the time is approximate for proofing – I finished proofing when the dough bounced back slowly after pressing. (This is technically slightly underproofing the dough which is alright because we want the baguettes rise the most in the oven spring phase. This renders that in the initial period of the baking phase the gluten is more elastic – not yet fully stretched – that helps to keep the shape, and the formation of the desired internal structure. At this point therefore not only the already present gases contribute to expansion but so does the yeast until the dough reaches a temperature where they die.) Before transferring it into the oven, I scored the surface of the straight baguette using diagonal lines.
Step 8: I used a tray and water bath to pre-steam my oven, and set the temperature to 250 °C. The steam we need because the baguette rises the most in the oven, and hence the crust formation should be delayed that the steam helps by keeping the surface of the bread moist. In addition, I used a stainless steel baking tray for faster heat transfer that helps to achieve maximal initial spring. I baked the bread until golden brown and cooled it down on a rack.
The aim was to create a baguette with an open crumb and good oven spring, supported by a poolish for extensibility and flavour. As a result, I got a baguette with quite sizeable alveoli, however, on the side at some places I saw a slightly denser crumb. I suspect the reason for this should be that I unfortunately forgot to turn off top heating at the beginning, which made the surface of the straight baguette crust too early, so it could’t fully expand. For the same reason, the crumb also opened a bit irregularly, so the steam escaped at multiple places, which caused the dough crack a bit in certain areas. In the case of the epi shape, the alveoli are smaller which I think is the consequence of the shape itself as well as slightly lower oven temperature at this point.
Traducido del inglés Iván Navas, Maloles Muñoz y3 más7 Comentarios
-
 Level:
 Executive Chef
Maravilloso!!
-
Level:
Scoolinary Team
Réka, this is such a thoughtful entry. You didn’t just present baguettes, you explained the “why” behind each step, from the 16-hour poolish to the folds, shaping, steam, and even your own diagnosis of the crumb.
The epi shape adds personality, and the baguette shows good oven spring and a lovely open texture. I really enjoyed how you connected technique with observation, that’s where the real learning happens.
What would you adjust first next time: oven heat, steaming, or final proofing?-
@soldamiani Hi Sol! Thank you for your kind words!
As for the epi where I suspected that the oven temperature wasn’t right, I used less Water for pre-steaming which also means that there was less convection in the oven than in the straight baguette case which affects Heat transfer and hence the rising. It would have been in principle possible to increase temperature a bit instead of using more steam But I have a college dorm oven where 250 degrees is the maximum. So definitely I’d go with more steam. I also think probably this would be best because when eating more from that baguette there were more pieces with larger pockets inside, so probably the proofing was alright, just the Heat transfer wasn’t enough (where there were air pockets there may have been locally more leavening gases or oven hot spots, this probably would be smart to test at some point).
For the straight baguette, I am very sure that the top heating was the main problem, that I should have turned off earlier (I kept it at heating stage because it was faster 🙈…)-
Level:
Scoolinary Team
@rekahorvathr-e2c3b8 Reka, thank you for sharing your oven tests; the crumb looks airy and the crust golden, the epi shape stands out and your analysis of the oven limits is inspiring. What’s the most valuable insight you gained from this bake, and how will you apply it next time? We’d love to see your next batch
-
@soldamiani Hey! I suppose what was the most valuable is that in order to do an entirely different type of baking that I usually do, I dived a lot deeper into what is actually happening on the level of chemistry and physics to get a good bread structure, and I think all of that from things about flour types and gluten to shaping, etc, will be very useful for my other activities. As for bread, I have never felt attracted to bread baking, but it was interesting that actually only a couple of ingredients and controlled processes led to something that tasted like what I like and I’d buy in a bakery, and that with some tricks it is possible – to some extent – achieve good results at this without high-grade equipment. So it was very interesting for sure and also quite useful for an exercise in creativity/logical thinking about baking (though I wouldn’t say I am now converted to be a bread baking person from French pastry – but I am definitely more comfortable now with making my own bread, so it may happen again!)
-
-
Level:
Scoolinary Team
@rekahorvathr-e2c3b8 I love how you approached this, going deep into the “why” and not just the result. That curiosity is what really sharpens your craft. And honestly, achieving this level with a dorm oven says a lot about your control and intuition.
Even if bread isn’t your main path, this kind of thinking will elevate everything you do. Keep that edge, it shows 👨🍳
-
@soldamiani Thank you Sol – that’s very kind! 🙂 💖
-
-
-
- Favorece el desarrollo del sabor fermentado y sube mejor gracias a una fermentación más larga.