-

belportaq posted an update
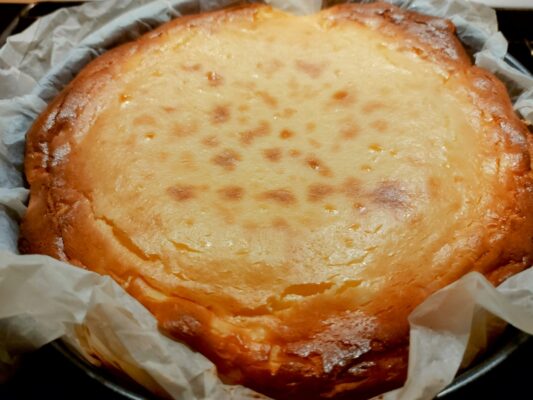
I made the san sebastian cheesecake, but it didn’t turn out like in the course… I left it longer because I didn’t see it brown on the top. It was soft on the inside but I feel it was not as sweet as it should be. Any suggestions?
Hola!! Hice el cheesecake san sebastian, pero no me quedo como en el curso… lo deje mas tiempo porque no vi que se doraba nunca en la parte de arriba. Me quedo suave por dentro pero siento que muy poco dulce y no como deberia ser. Alguna sugerencia??
 Translated from Spanish
 Cary B, Lana Mihajlović and 2 others4 Comments
-

Hi, the oven temperature should be between 120 or 140 degrees for an hour and after you take it out of the oven put a thermometer in the middle if it reaches 70 degrees the cheesecake is ready!
Hola la temperatura del horno debe estar entre 120 o 140 por una hora y luego que lo sacas del horno pones un termometro en el medio si llega a 70 grados el cheesecake esta pronto!
2a year agoTranslated from Spanish
-
Level:
 Scoolinary Team
hi Belén, thank you for sharing your cheesecake, I’m glad you decided to prepare this version with aged cheese, it gives it a very special touch.
Let’s check what could have happened with those cracks that formed on the surface.
This type of cracks usually appear due to sudden differences in temperature or a slightly intense or unbalanced cooking.
Here are some suggestions that may help you to improve the result in the next attempt:
1. Preheating the oven: As a general rule, it is very important to preheat the oven between 20 and 25 minutes before putting in any preparation. This ensures that it is really at the 210 °C indicated in the recipe and that the baking is even from the start.
2. Use of oven thermometer: Sometimes, ovens mark a temperature, but internally it is not the real one. For this reason, it is very useful to have an internal oven thermometer, so you can make sure that the oven is really at 210 °C and avoid overcooking or leaving it raw inside.
3. Oven height: Ideally, bake on the middle rack. This allows the heat to circulate evenly, so that the top browns properly and does not crack from too much heat from below or from the sides.
4. Pan height: If you use a pan that is too high or filled to the top, it can also affect baking. It is advisable to fill the pan only up to ¾ of its capacity to allow the heat to penetrate well and the dough to expand without breaking.
Also, when coming out of the oven, it is best to let it cool inside the mold and inside the oven with the door ajar for about 10-15 minutes. This helps prevent the temperature change from being too abrupt and causing cracks.
One question: did you notice if your oven heats more on one side than the other? Sometimes that can also affect it. And another question, did you let the mixture rest before baking or did it go straight into the mold? Sometimes that also helps stabilize the incorporated air and gives a more even result.
you’re on the right track! Small details make a big difference, and the important thing is that you keep trying and enjoying the process and we are here to help you.❤️
Level:
Scoolinary Team
¡Hola Belén! Gracias por compartir tu cheesecake, qué bueno que te animaste a preparar esta versión con queso curado, que le da un toque muy especial.
Vamos a revisar qué pudo haber pasado con esas grietas que se formaron en la superficie.
Este tipo de grietas suele aparecer por diferencias bruscas de temperatura o por una cocción un poco intensa o desequilibrada.
Acá van algunas sugerencias que pueden ayudarte a mejorar el resultado en el próximo intento:
1. Precalentado del horno: Por regla general, es muy importante precalentar el horno entre 20 y 25 minutos antes de meter cualquier preparación. Esto asegura que realmente esté a los 210 °C que indica la receta y que el horneado sea parejo desde el inicio.
2. Uso de termómetro de horno: A veces, los hornos marcan una temperatura, pero internamente no es la real. Por eso, es súper útil tener un termómetro interno de horno, así puedes asegurarte de que el horno está efectivamente a 210 °C y evitar que se sobrecocine o quede crudo por dentro.
3. Altura del horno: Lo ideal es hornear en la parrilla del medio. Esto permite que el calor circule de forma pareja, que la parte de arriba dore correctamente y no se agriete por exceso de calor desde abajo o desde los costados.
4. Altura del molde: Si usás un molde muy alto o lleno hasta el tope, también puede afectar el horneado. Lo recomendable es llenar el molde solo hasta ¾ de su capacidad para permitir que el calor penetre bien y la masa tenga espacio para expandirse sin sufrir rupturas.
Además, al salir del horno, lo mejor es dejar enfriar dentro del molde y dentro del horno con la puerta entreabierta unos 10-15 minutos. Eso ayuda a evitar que el cambio de temperatura sea muy brusco y genere grietas.
Una pregunta: ¿notaste si tu horno calienta más de un lado que del otro? A veces eso también puede afectar. Y otra consulta, ¿dejaste reposar la mezcla antes de hornear o fue directo al molde? A veces eso también ayuda a estabilizar el aire incorporado y da un resultado más parejo.
¡Vas por muy buen camino! Los pequeños detalles hacen una gran diferencia, y lo importante es que sigas probando y disfrutando el proceso y aquí estamos para ayudarte.❤️
2a year agoTranslated from Spanish
-
Level:
Executive Chef
I make it a lot at home, the last one a week ago, this photo gives you how it has to look, I have it exactly 50′ and 5 inside with the oven between open.
My recipe is different, my husband is from San Sebastian and I make the one from the famous restaurant.
Equally delicious
Level:
Executive Chef
Yo lo hago mucho en casa, el último hace una semana, esta foto te di ce como tiene que quedar, yo lo tengo exactamente 50′ y 5 dentro con el horno entre abierto.
Mi receta es distinta, mi marido es de San Sebastián y hago la del famoso restaurante.
Igualmente rica
1a year agoTranslated from Spanish
-
@Mercedes Minaya Palacios Oooh, your husband is from San Sebastian? You got a lot to live up to flavour wise. 🤣🤣🤣
-
-