

Scoolinary › Forums › Ask a question › Lamination – cutting process
Tagged: #croissant, #lamination, #PLF
-
Lamination – cutting process
Posted by Mina Starkonic on August 12, 2025 at 15:48Hello everyone,
I was wondering if someone could help me understand what’s going wrong with my lamination.
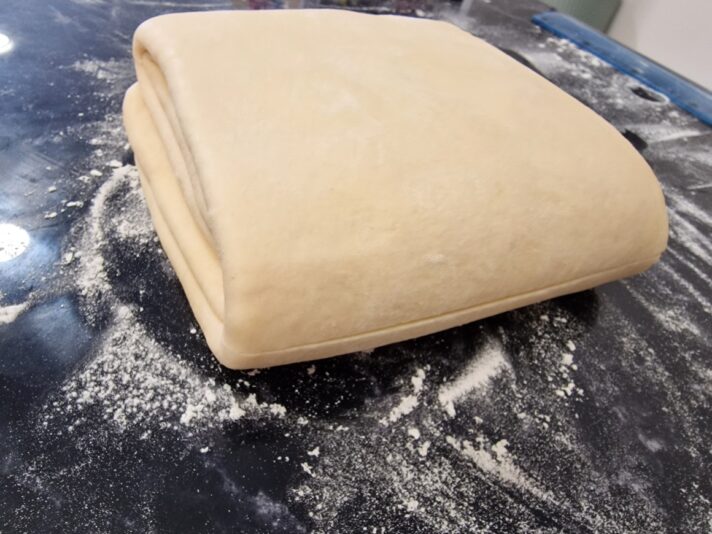
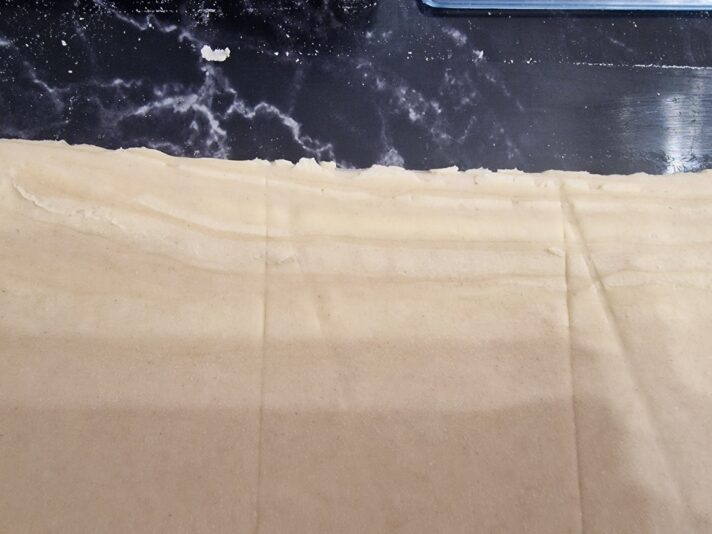
In image 1, I started cutting from the folded edge to get clean edges for rolling. However, I consistently end up with these pyramid-like edges in the dough, which ruin the lamination and final shape.
Is this a known issue? Am I cutting incorrectly or missing something in the process?
Thank you in advance for your help!
— Mina Sussan Estela Olaya replied 10 months ago 3 Members · 6 Replies
 -
6 Replies
-
 Level:
 Scoolinary Team
Hi Mina @jasmina-starkonic
From what I can see in your images, the issue with the “pyramidal” edges seems to be more related to how the butter is distributed during the lamination and trimming process, rather than the cutting itself.
Here are some possible causes and how to avoid them:
Possible causes of the “pyramidal” edge
1. Butter not spread evenly
If the butter is not completely level and of uniform thickness before starting, it will accumulate more in certain areas (usually toward the center) when rolling out the dough, creating the effect of higher layers on one side and thinner layers on the other.2. Uneven pressure with the rolling pin
If you apply more pressure in the center or on one side during the first folds, the layers will shift and “stack up” toward one edge, giving that slanted or pyramidal profile.3. Trimming the edges too conservatively
Even if you trim before rolling, if the cut does not fully remove the part where the butter is compressed and firm, the layers won’t “open up” evenly, and the pyramidal effect will remain.4. Insufficient resting time or incorrect temperature
If the dough is too cold and firm, the butter won’t stretch at the same rate as the dough and may break or accumulate in certain areas; if it’s too soft, it will blend into the dough and lose definition.How to improve it
-
Level the butter from the start: make sure the block is perfectly rectangular and of even thickness before incorporating it.
-
Apply progressive, even pressure: in the first roll-outs, press gently and evenly, starting from the center toward the edges so the butter spreads evenly.
-
Trim more generously: when cutting the edges before rolling, fully remove the “sealed” areas so the layers can breathe and expand evenly.
-
Control your rotations: always turn the dough in the same direction with each fold to avoid shifting the layers unevenly.
I hope this information helps, and if you have any other questions, I’m here to assist.
Best regards,
Susan
Scoolinary Team -
-
Thank you Sussan!
I’ve been reflecting on your advice and trying to narrow down what might be causing the pyramid edges.
-
My butter block is level—I press it between two wooden boards and check by hand after rolling.
-
Dough temperature is well-controlled; I cool it thoroughly, even if it adds two extra hours to the process.
-
Rolling pressure seems consistent, though I know that’s hard to judge perfectly.
But trimming… that’s where I’m unsure. I noticed that when I followed the beginner’s approach without trimming before rolling, I didn’t have this issue. It only started once I began cutting the edges. So now I’m wondering: Could I be trimming too shallowly? Or maybe too late in the process? I try to cut cleanly, but maybe the technique itself is compressing the layers?
Would love your thoughts on how to trim properly—especially for beginners trying to avoid this kind of lamination damage.
Thanks again for your help!-
Level:
Scoolinary Team
Hi Mina. @jasmina-starkonic
Hi Mina,
From what you describe and seeing your photos, the problem with the “pyramidal” edges may be closely related to when and how you trim the sides during lamination.
In the method Chef Bachour often teaches (and which I suspect you might be following), there’s an important detail: each time the sides are trimmed, it’s not just for appearance — it’s to release the layers and allow the butter to distribute evenly before continuing to roll.Possible causes in your case
Trimming too shallowly
If you only remove a very thin layer, the areas compressed by the rolling pin remain, and the butter won’t expand evenly, accumulating toward the center.Trimming too late
If you trim after rolling out significantly, the compression of the layers has already “moved” inward, making it hard to reverse.Pressure while cutting
If your tool is not very sharp or the cut is not clean, you may be sealing the layers again as you cut.Recommendations to improve
-
Trim at the beginning of each major rollout, right after the cold rest and before touching the rolling pin. This way you release the sealed layers from the previous rest.
-
Make a generous cut, removing 4–5 mm or as much as needed to ensure no compact edge remains.
-
Use a long, very sharp knife or a metal pizza cutter, cutting in one clean motion without dragging or pressing downward.
-
Keep the blade vertical while cutting, so you don’t squash the layers diagonally.
-
Check for symmetry before continuing: after trimming and before rolling, look to see if the edges have well-defined layers. If you already see butter accumulating toward the center, you can compensate with very light, even pressure toward the thinner areas.
Extra tip for beginners
If you didn’t trim before and didn’t see this issue, it’s possible that trimming has revealed an asymmetry that previously remained “hidden” in the edges. Practicing generous and early trimming will help you keep the lamination even and prevent the dough from deforming.
I hope this information helps, and if you have any other questions, I’m here to assist.
-
-
-
Level:
Scoolinary Team
Hey there @jasmina-starkonic !👋
Welcome to the Scoolinary Community! 😊Join our awesome group of food lovers and share your love of cooking. Everyone’s invited!
I’m Sol Damiani, the Community Builder and I’m from Buenos Aires.
I hope Sussan’s answer helped you. Please let us know if it did.
This is a Community that values your participation a lot. That’s why we created “Masters Game”, the game that could get you a FREE SUBSCRIPTION RENEWAL:
-
Win Scoolipoints by sharing a pic of your own dishes in our Community > Cooking Feed section. If it is really cool you can snag a #Scoolistar: you’ll win 100 Scoolipoints and we’ll give you a shoutout on social media!🤩
-
🏆Check out our Challenges and score Scoolipoints! We’re currently running the #GreenChallenge! 🌿 You can find all the details in the pinned post at the top of our Cooking Feed.
-
You’ll see everything you need to know about how to win Scoolipoints and renew your subscription for FREE here.
Let’s build a community of foodies together.
We hope you have a blast learning with Scoolinary!
-
-
Thank you so much, Sussan! Your explanation was incredibly clear and helpful — I really appreciate the time you took to break it all down. I hadn’t considered how trimming technique and rolling pressure could be affecting the butter distribution so dramatically. I’ll definitely be more generous with my edge cuts and pay closer attention to my rolling rhythm.
Thanks again for your support — it’s reassuring to know I can reach out here when things get tricky!
-
Level:
Scoolinary Team
Hi Mina, @jasmina-starkonic
I’m so glad to hear my answer was helpful to you, Mila! 😊 You can always count on this space to ask any questions you may have; I’ll be here, ready to help you with whatever you need, always with the best attitude. It will be a pleasure to keep supporting you on your journey!
Best regards,
Sussan
Scoolinary Team
-
The forum ‘Ask a question’ is closed to new discussions and replies.
